In the world of web development and hosting, understanding the difference between servers and web servers is crucial. This comprehensive guide will explain these fundamental concepts, show you how they differ, and walk you through setting up your own local web server with Node.js, complete with HTTPS and custom domain configuration.
What is a Server?
A server is a computer or system that provides resources, services, or programs to other computers (called clients) over a network. Servers form the backbone of modern computing infrastructure, powering everything from websites to mobile apps to enterprise software.
Key Characteristics of Servers:
- Always available: Typically designed to run 24/7 without interruption
- High-performance hardware: More powerful CPUs, more RAM, and more storage than typical computers
- Multiple connections: Engineered to handle many simultaneous client requests
- Specialized software: Runs server operating systems (Windows Server, Linux distributions) and server applications
Types of Servers
| Server Type | Purpose | Examples |
|---|---|---|
| Web Server | Hosts websites and web applications | Apache, Nginx, IIS |
| Database Server | Stores and manages data | MySQL, PostgreSQL, MongoDB |
| File Server | Stores and shares files | FTP servers, NAS devices |
| Application Server | Runs specific applications | Node.js, Tomcat, JBoss |
What is a Web Server?
A web server is a specialized type of server designed specifically to handle HTTP/HTTPS requests and serve web content to clients (typically web browsers). Web servers are the foundation of the World Wide Web, delivering the websites and web applications we use every day.
How Web Servers Work
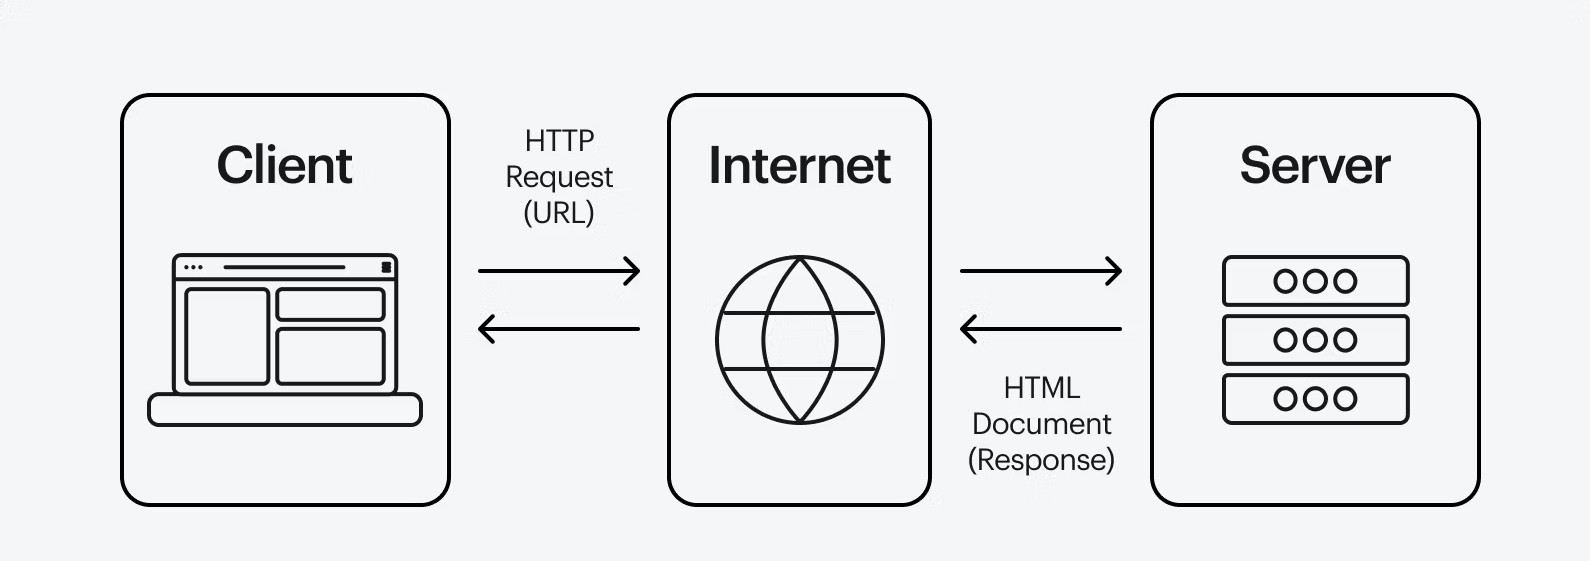
The process of serving a web page involves several steps:
- Client Request: A user enters a URL or clicks a link in their browser
- DNS Lookup: The browser resolves the domain name to an IP address
- HTTP Request: The browser sends an HTTP/HTTPS request to the web server
- Request Processing: The web server processes the request (may involve application servers or databases for dynamic content)
- Response Generation: The server generates an appropriate HTTP response
- Content Delivery: The response (HTML, CSS, JS, images, etc.) is sent back to the client
- Rendering: The browser renders the received content into the visible webpage
Key Differences Between Servers and Web Servers
| Feature | General Server | Web Server |
|---|---|---|
| Primary Function | General-purpose resource provider | Specifically handles HTTP/HTTPS requests |
| Protocols Supported | Multiple (FTP, SMTP, SSH, etc.) | Primarily HTTP/HTTPS (sometimes WebSocket) |
| Content Handling | Any type of data or service | Web content (HTML, CSS, JS, media files) |
| Performance Focus | Depends on service type | High concurrent connection handling |
| Examples | File servers, game servers, database servers | Apache, Nginx, IIS, Node.js HTTP server |
Setting Up a Local Web Server with Node.js
Let's walk through creating a local web server with Node.js, complete with HTTPS support and custom domain configuration for development purposes.
1. Prerequisites
Before you begin, ensure you have:
- Node.js installed (version 14 or higher recommended)
- npm (comes with Node.js) or yarn
- A code editor (VS Code, Sublime Text, etc.)
- Basic terminal/command prompt knowledge
2. Creating a Basic HTTP Server
First, let's set up a simple HTTP server using Express, a popular Node.js framework:
mkdir my-web-server
cd my-web-server
# Initialize a new Node.js project
npm init -y
# Install Express
npm install express
Create a file named server.js with the following content:
const express = require('express');
const app = express();
const port = 3000;

// Serve static files from 'public' directory
app.use(express.static('public'));

// Basic route
app.get('/', (req, res) => {
    res.send('<h1>Welcome to My Local Web Server</h1><p>This is a basic Node.js web server.</p>');
});

// Start the server
app.listen(port, () => {
    console.log(`Server running at http://localhost:${port}`);
});
Create a public directory and add an index.html file. Then start your server:
Visit http://localhost:3000 in your browser to see your server in action!
3. Adding HTTPS Support
For HTTPS, we need SSL/TLS certificates. Here's how to generate self-signed certificates for development:
openssl genrsa -out key.pem 2048
# Generate certificate signing request
openssl req -new -key key.pem -out csr.pem
# Generate self-signed certificate (valid for 365 days)
openssl x509 -req -days 365 -in csr.pem -signkey key.pem -out cert.pem
Now modify your server.js to use HTTPS:
const express = require('express');
const https = require('https');
const fs = require('fs');
const app = express();
const port = 3000;

// SSL options
const options = {
    key: fs.readFileSync('key.pem'),
    cert: fs.readFileSync('cert.pem')
};

app.use(express.static('public'));

app.get('/', (req, res) => {
    res.send('<h1>Welcome to My Secure Server</h1><p>Now using HTTPS!</p>');
});

// Create HTTPS server
https.createServer(options, app).listen(port, () => {
    console.log(`HTTPS server running at https://localhost:${port}`);
});
Important Note: Browsers will display security warnings for self-signed certificates. This is normal for development. In production, always use certificates from trusted Certificate Authorities like Let's Encrypt.
4. Using a Custom Domain for Local Development
To use a custom domain like myapp.test with your local server:
- Edit your hosts file:
- Windows:
C:\Windows\System32\drivers\etc\hosts - Mac/Linux:
/etc/hosts
127.0.0.1 myapp.test - Windows:
- Generate a certificate for your domain:
openssl req -new -x509 -key key.pem -out cert.pem -days 365 -subj '/CN=myapp.test'
- Update your server to use port 443 (standard HTTPS port):
https.createServer(options, app).listen(443, () => { console.log('Server running at https://myapp.test'); }); - Access your site at
https://myapp.test(you'll need to accept the security warning)
Popular Web Server Software Options
While we've focused on Node.js, there are several excellent web server options:
| Web Server | Type | Best For | Performance |
|---|---|---|---|
| Apache HTTP Server | Traditional | General purpose, .htaccess support | Good |
| Nginx | Traditional | High traffic sites, reverse proxy | Excellent |
| Node.js (Express) | Application | JavaScript applications, APIs | Very Good |
| Caddy | Modern | Automatic HTTPS, simple config | Good |
| LiteSpeed | Commercial | High performance with low resource usage | Excellent |
Conclusion
Understanding the difference between general servers and web servers is fundamental for anyone working with web technologies. While all web servers are servers, not all servers are web servers. Web servers specialize in handling HTTP/HTTPS requests and delivering web content efficiently.
The ability to set up your own local web server is an invaluable skill for web development. With Node.js and Express, you can quickly create a development environment that mimics production servers, complete with HTTPS and custom domains.
Key Takeaways:
- Servers are general-purpose resource providers, while web servers specialize in HTTP content
- Node.js makes it easy to create lightweight web servers for development
- HTTPS is essential even for local development to match production environments
- Custom domains in development help test real-world scenarios
- Choose your production web server based on your specific needs and traffic expectations
With this knowledge, you're well-equipped to work with web servers in both development and production environments. Happy coding!